How to Paint Flowers with Acrylics
Painting flowers with acrylics is a rewarding and creative process that allows you to explore color, texture, and composition. Whether you’re a beginner or an experienced artist, this extensive guide will walk you through every step of creating a vibrant floral painting. From sketching the initial shapes to adding intricate details, this tutorial will help you develop your skills and create a masterpiece. Let’s dive i
Materials Needed
Before we begin, gather your materials:
- Drawing Tools: Willow charcoal or graphite for sketching.
- Acrylic Paints: Titanium white, lemon yellow, cadmium yellow, cadmium red, ultramarine blue, raw umber, and any other colors you’d like to experiment with.
- Brushes: A variety of sizes, including a large brush (e.g., brush #16) for blocking in colors and smaller brushes for details.
- Canvas or Paper: Choose a surface that suits your style.
- Palette: For mixing colors.
- Water: For cleaning brushes and thinning paint.
- Paper Towels or Cloth: For wiping brushes and correcting mistakes.
- Fixative (Optional): To seal your charcoal sketch if needed.
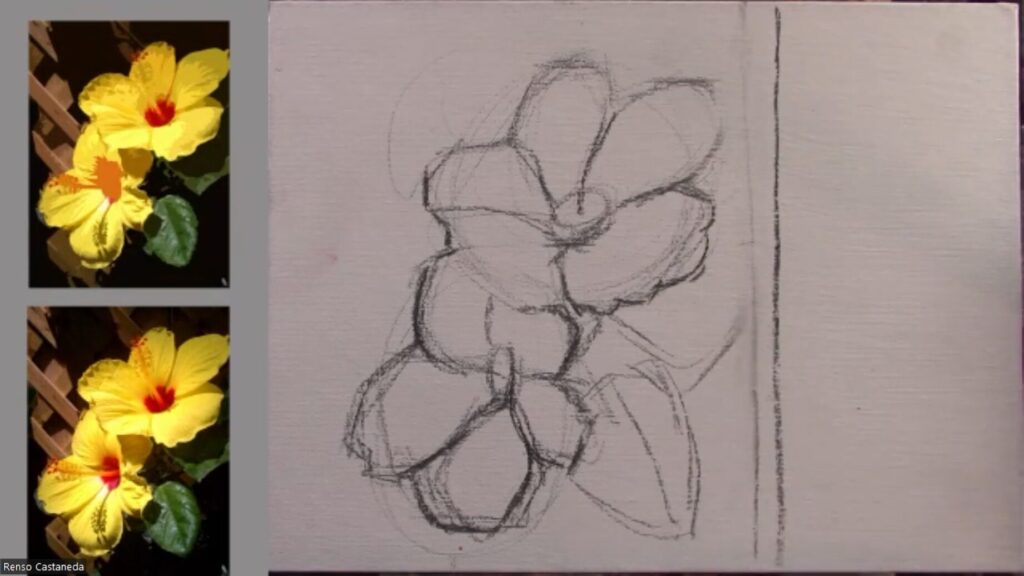
Step 1: Sketching the Flowers
- Start with a Light Sketch: Use willow charcoal or graphite to lightly sketch the basic shapes of the flowers. Focus on the overall form rather than details. Think of the flowers as simple geometric shapes like ovals, circles, or triangles.
- Group the Flowers: Arrange the flowers into clusters or groups to create a balanced composition. For example, you might place two flowers close together and a third slightly apart.
- Check Proportions: Measure the distance between the flowers and the edges of the canvas to ensure a balanced layout. Use your brush or a ruler to compare distances.
- Outline the Leaves and Background: Sketch the leaves and the negative space (background) around the flowers. This helps define the positive shapes (flowers) and creates a sense of depth. Pay attention to the alignment of leaves and petals.
Step 2: Preparing the Canvas
- Wipe Off Excess Charcoal: Use a cloth or paper towel to gently wipe off excess charcoal. This prevents it from mixing with your paint and muddying the colors. If you used charcoal, consider using a fixative to seal the sketch.
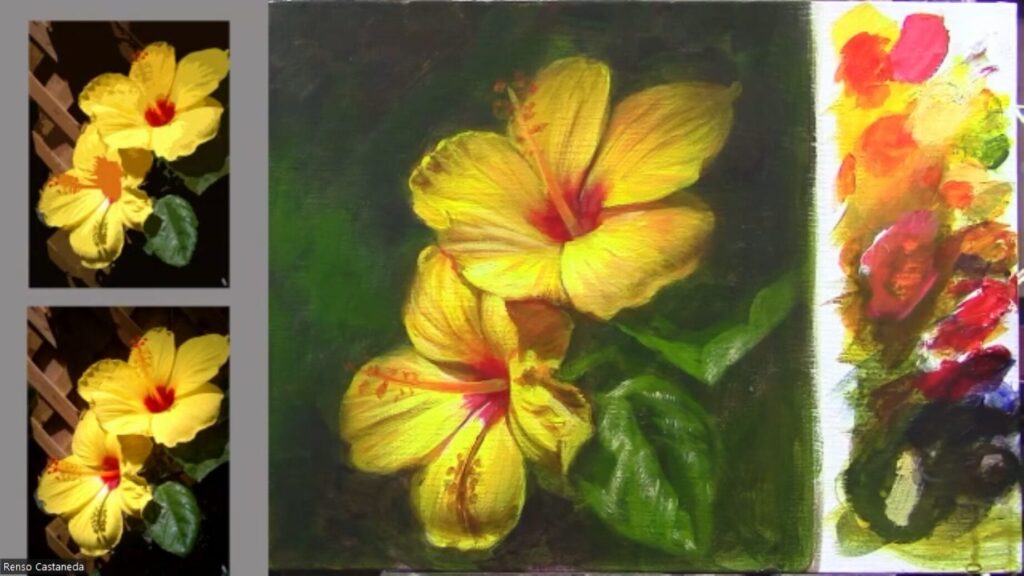
- Set Up Your Palette: Squeeze out your acrylic paints onto the palette. Include titanium white, lemon yellow, cadmium yellow, cadmium red, ultramarine blue, and raw umber. You can also add other colors like green or orange for variety.
- Spray Water on the Palette: Lightly spray water on your palette to keep the acrylics from drying too quickly. This is especially helpful if you’re working in a warm or dry environment.
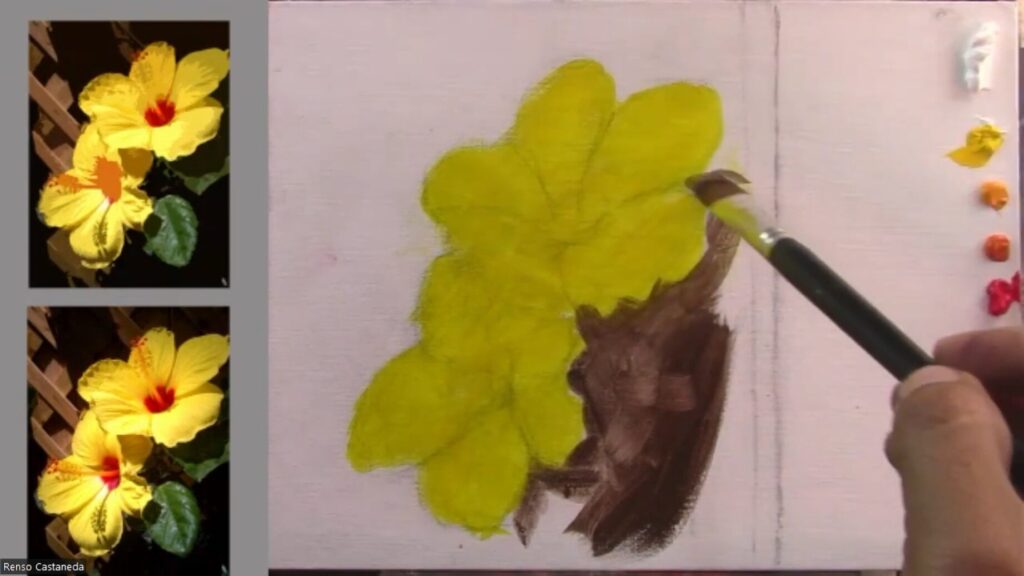
Step 3: Blocking in Colors
- Paint the Base Layer: Start by covering the canvas with a base layer of the brightest yellow for the flowers. Use a large brush (e.g., brush #16) to apply the paint evenly. Don’t worry about perfection at this stage—focus on covering the canvas.
- Add the Background: Mix a darker color (e.g., ultramarine blue + raw umber + lemon yellow) for the background. Paint around the flowers, keeping the edges soft to avoid harsh lines. Use a lighter touch near the edges of the flowers to create a natural transition.
- Work from Top to Bottom: Paint the flowers from the top of the canvas downward, ensuring smooth transitions between colors. This helps maintain a consistent workflow and prevents smudging.
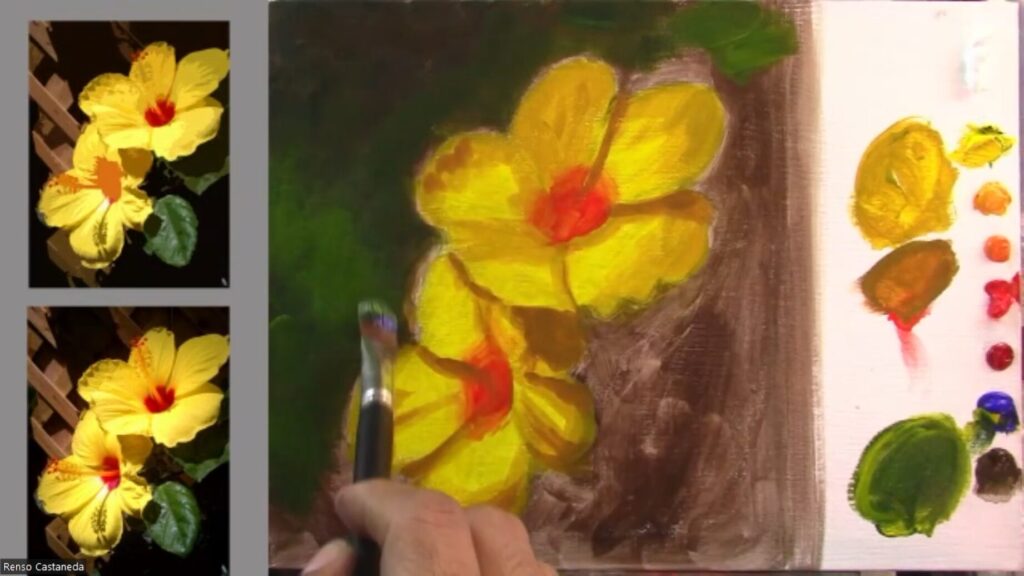
Step 4: Adding Depth and Shadows
- Mix Shadow Colors: To create shadows on the petals, mix darker shades of yellow by adding raw umber or a touch of violet (ultramarine blue + cadmium red) to your base yellow. Experiment with different ratios to achieve the desired depth.
- Paint the Shadows: Apply the shadow colors to the areas of the petals that recede or overlap. Use a smaller brush for precision. Pay attention to the direction of light in your reference photo to ensure accurate shading.
- Blend Edges: Soften the edges of the shadows with a clean, damp brush to create a natural transition between light and dark areas. This technique adds realism and depth to your painting.

Step 5: Highlighting and Detailing
- Add Highlights: Mix titanium white with a bit of lemon yellow to create a bright highlight color. Apply this to the areas of the petals that catch the most light. Use a small brush for fine details.
- Define the Centers: Use cadmium red or a similar color to paint the centers of the flowers. Blend the edges slightly to avoid harsh lines. Add subtle variations in color to create interest.
- Refine the Leaves: Paint the leaves with a mix of green (ultramarine blue + lemon yellow + raw umber). Add highlights and shadows to give them dimension. Use a fine brush to add veins or texture if desired.
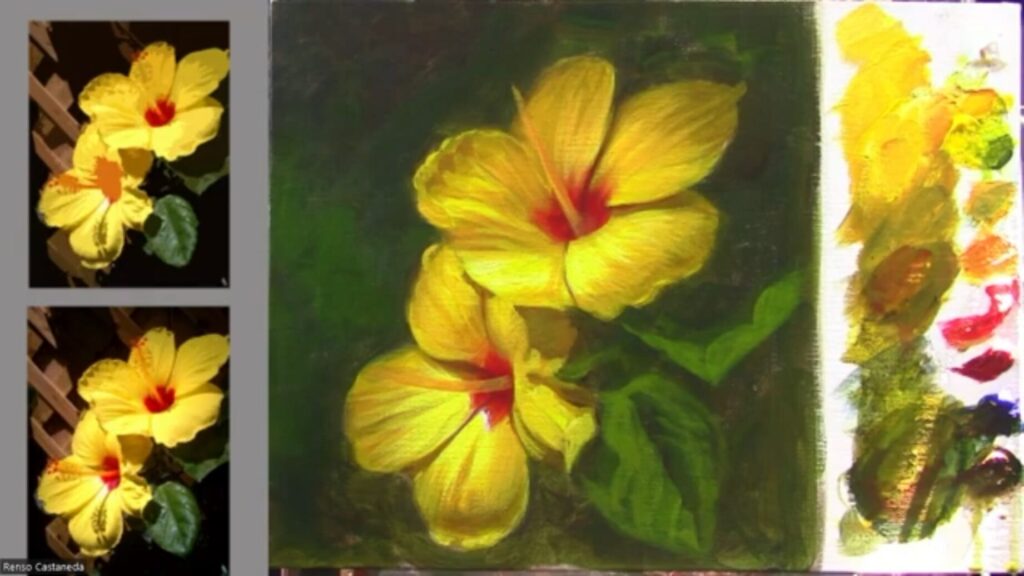
Step 6: Final Adjustments
- Check Values: Squint your eyes to compare the values (lightness and darkness) in your painting with the reference photo. Adjust as needed by darkening shadows or brightening highlights. This step ensures a balanced and realistic composition.
- Refine Edges: Ensure a balance between sharp and soft edges. Use a damp brush to soften edges where needed, and add sharp details to areas you want to stand out. For example, you might sharpen the edges of the petals closest to the viewer and soften those in the background.
- Add Final Details: Use a small brush to add fine details, such as veins on the leaves or subtle texture on the petals. This is your opportunity to add personality and depth to your painting.
Step 7: Review and Finish
- Step Back and Assess: Take a step back from your painting to view it from a distance. This helps you see the overall composition and identify any areas that need adjustment.
- Make Final Touches: Add any final touches, such as adjusting colors, refining edges, or enhancing highlights. Don’t overwork the painting—sometimes less is more.
- Sign Your Work: Once you’re satisfied with your painting, sign your name in the corner. This marks your creation as your own and adds a personal touch.
Support my Art Journey At not cost to you buying Art materials you use from my Amazon Store: https://www.amazon.com/shop/rensoart
Tips for Success
- Work Quickly: Acrylics dry fast, so work in sections and blend edges while the paint is still wet.
- Use Reference Photos: Refer to your photo often to ensure accurate colors and values.
- Experiment with Edges: Play with sharp, soft, and lost edges to create depth and movement in your painting.
- Practice Patience: Take your time with each step, especially when adding details. Rushing can lead to mistakes.
- Have Fun: Enjoy the process and let your creativity flow!
Conclusion
Painting flowers with acrylics is a wonderful way to explore color, texture, and composition. By following this extensive guide, you’ll develop the skills and confidence to create beautiful floral paintings. Remember, every artist’s journey is unique, so don’t be afraid to experiment and make the process your own. Share your work with fellow artists, seek feedback, and continue to grow as a creator. Happy painting!
Additional Resources
- Books: Consider reading books by master artists like Richard Schmid for inspiration and advanced techniques.
- Online Communities: Join online art communities or social media groups to share your work and connect with other artists.
- Practice Regularly: The more you paint, the more you’ll improve. Set aside time each week to practice and experiment with new techniques.
By following these steps and tips, you’ll create stunning floral paintings that capture the beauty of nature. Keep exploring, learning, and creating—your artistic journey is just beginning!